Video: Zebra Tabletop and Print Engine Printhead Cleaning Procedure

Video: Zebra Tabletop and Print Engine Printhead Cleaning Procedure

A dirty print head can result in poor heat transfer and a poorly printed image. White streaks can appear if elements are dirty as a result of residue or other buildup on the printhead elements. These deposits could allow heat buildup on the elements and result in premature element failure.
issue / question
This procedure details methods used for • Cleaning the printhead on a Zebra Tabletop or Pax printer • Printhead maintenance and care
applicable to
Zebra Tabletop and Print Engine printers
resolution / answer

Cleaning The Zebra Printhead


Inconsistent print quality such as voids in the bar codes or graphics may indicate a dirty Printhead. For optimum performance, the printhead should be cleaned regularly. Zebra Technologies Corporation recommends performing the cleaning procedure when installing a new Roll of Ribbon or after 3 rolls of label stock.

Note: You are not required to turn off the printer power for this procedure.   Remove all rings, watches, hanging necklaces, identification badges, or other jewelry that could touch the print head or get caught in the printer.  If you turn off the power, you will lose all temporary settings, such as label formats, and you must reload them before you resume printing.
Click here for information on extending the life of your printhead.

.
Zebra Tabletop and Print Engine Printhead Cleaning Procedure

Printhead Cleaning Procedure:

1. Open the Printhead by moving the Printhead Lever to the OPEN position.
2. Remove the media and ribbon (if present).
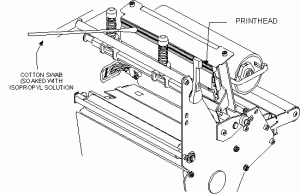
3. Use a cleaning swab (99.7% isopropyl alcohol) and wipe the print elements from end to end. (The print elements are the grayish/ black strip just behind the chrome strip on the underside of the Printhead.) Allow a few seconds for the solvent to evaporate.
4. Rotate the Platen Roller and clean thoroughly with a cleaning swab.
5. Brush or vacuum any accumulated paper lint and dust away from the Rollers
and the Media and Ribbon Sensors.
6. Reload ribbon and/ or media, close and latch the Printhead, restore power
(if necessary) and run the PAUSE Key self test to check print quality.
Click here for Pens and Kits information

Note: Silverline RFID printer printheads must only be cleaned using Save-A-Printhead Cleaning Film shown below.

Helpful Information

Extending the life of your printhead Read More>>

Tough or hardened printhead buildup can be removed using “Save A Printhead” Cleaning Strips  Read More>>
Part Numbers for Save-A-Printhead Cleaning Film Kits. Order kit number: For Printers with Print Widths:

  • 46902  3.0″ – 4.0″  (76 mm–102 mm)
  • 44902  4.0″ – 5.0″ (102 mm – 127 mm)
  • 48902  5.0″ – 6.0″ (127 mm – 152 mm)
  • 38902  6.0″ – 7.0″ (152 mm – 178 mm)
  • 22902  8.0″ – 9.0″ (178 mm – 229 mm)

Cleaning the Printhead

Cleaning the Printhead

Always use a new cleaning pen on the printhead. (An old pen carries contaminants from its previous uses that may damage the printhead.)
The printhead becomes hot while printing. To protect from damaging the printhead and risk of personal injury, avoid touching the printhead. Use only the cleaning pen to perform maintenance.
When you load new media, you can also clean the printhead.
  • Rub the cleaning pen across the dark area of the printhead. Clean from the middle to the outside. This will move adhesive transferred from the edges of the media to the printhead outside of the media path.
  • Wait one minute before closing the printer.
    When you clean the printer, use one of the following supplies that best suits your needs:
    Cleaning Supplies
    Cleaning Supplies
    Order Quantity
    Intended Purpose
    Cleaning pens (105950-035)
    Set of 12
    Clean printhead
    Cleaning swabs (105909-057)
    Set of 25
    Clean media path, guides and sensors
    You can obtain cleaning supplies at zebra.com/supplies.
    The cleaning process takes just a couple of minutes using the steps outlined below.
    Cleaning Process
    Printer Part
    Method
    Interval
    Printhead
    Allow the printhead to  cool for a minute, then use a new cleaning pen to swab the dark line on the printhead cleaning from the center to the outside edges of the printhead. See Cleaning the Printhead.
    After every roll of media.
    Platen roller
    Remove the platen roller to clean. Clean the roller thoroughly with 90% medical-grade alcohol and a cleaning swab or lint-free cloth. See Platen Cleaning and Replacement.
    As needed.
    Peel bar
    Clean it thoroughly with 90% medical-grade alcohol and a fiber-free cleaning swab. Let alcohol dissipate and the printer dries completely.
    Media path
    Exterior
    Use a water-dampened cloth.
    Interior
    Gently brush out the printer.
    Adhesives and media material can over time transfer onto the printer components along the media path including the platen and printhead. This build-up can accumulate dust and debris. Failure to clean the printhead, media path, and platen roller could result in inadvertent loss of labels, label jams, and possible damage to the printer.
    Using too much alcohol can result in contamination of the electronic components requiring a much longer drying time before the printer will function properly.
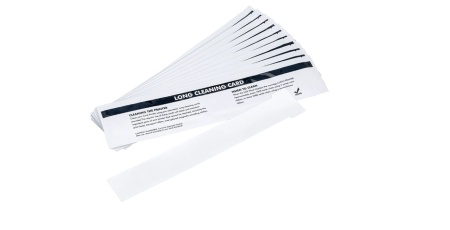
Zebra 105999-400 Printer Cleaning Kit

Extend the life of your Zebra printer with a cleaning kit

In order to ensure long-term stable operation of the printer and maintain excellent print quality, regular maintenance is particularly critical. Zebra Printer Cleaning Kits provide an easy and effective way to maintain your printing equipment, extending its life and ensuring efficient daily operations.

Why Printer Maintenance Is Critical?

Regular printer maintenance not only reduces the risk of equipment failures and deterioration in print quality but also saves on repair costs and time. Especially in high-frequency use environments, printer components such as transmission belts, cleaning rollers, and printheads are susceptible to dust, ink residues, and other dirt. If not cleaned promptly, these accumulations can lead to paper jams, blurred ink, or even equipment malfunctions.

Benefits of Using Zebra Printer Cleaning Kits

  1. Comprehensive Cleaning: Zebra printer cleaning kits include various professional tools such as cleaning cards and swabs, which thoroughly clean critical internal printer components, ensuring stable print quality.
  2. Equipment Protection: Regular use of cleaning kits effectively protects printer transmission parts and printheads, prolonging device lifespan and reducing maintenance and replacement costs.
  3. Enhanced Efficiency: Cleaning your printer regularly prevents printing interruptions and quality issues, enhancing work efficiency and user satisfaction.

Steps to Use: How to Properly Clean Zebra Printers

  1. Prepare Cleaning Tools: Ensure you have an adequate supply of cleaning cards, swabs, and other tools necessary to effectively remove internal and external dirt.
  2. Execute Cleaning Procedures: Follow the instructions provided with the Zebra printer cleaning kit to sequentially clean printer transmission belts, cleaning rollers, printheads, and other components. Ensure thorough cleaning of each part without leaving residues.
  3. Establish Regular Maintenance: Establish a regular maintenance schedule based on usage frequency to ensure your printer remains in optimal working condition.

Conclusion

By using Zebra printer cleaning kits, you can not only extend the life of your device, but also improve print quality and productivity. Zebra 105999-400 Printer Cleaning Kit, including 4 CR80 cleaning cards and 12 cleaning swabs, is designed to keep your printing equipment clean and running efficiently. Regular maintenance of your printer will become an important part of ensuring the smooth operation of office processes, while saving maintenance costs and time, bringing more convenience and reliability to your work and life.