Video: Zebra Tabletop and Print Engine Printhead Cleaning Procedure

Video: Zebra Tabletop and Print Engine Printhead Cleaning Procedure

A dirty print head can result in poor heat transfer and a poorly printed image. White streaks can appear if elements are dirty as a result of residue or other buildup on the printhead elements. These deposits could allow heat buildup on the elements and result in premature element failure.
issue / question
This procedure details methods used for • Cleaning the printhead on a Zebra Tabletop or Pax printer • Printhead maintenance and care
applicable to
Zebra Tabletop and Print Engine printers
resolution / answer

Cleaning The Zebra Printhead


Inconsistent print quality such as voids in the bar codes or graphics may indicate a dirty Printhead. For optimum performance, the printhead should be cleaned regularly. Zebra Technologies Corporation recommends performing the cleaning procedure when installing a new Roll of Ribbon or after 3 rolls of label stock.

Note: You are not required to turn off the printer power for this procedure.   Remove all rings, watches, hanging necklaces, identification badges, or other jewelry that could touch the print head or get caught in the printer.  If you turn off the power, you will lose all temporary settings, such as label formats, and you must reload them before you resume printing.
Click here for information on extending the life of your printhead.

.

Zebra Tabletop and Print Engine Printhead Cleaning Procedure

Printhead Cleaning Procedure:

1. Open the Printhead by moving the Printhead Lever to the OPEN position.
2. Remove the media and ribbon (if present).
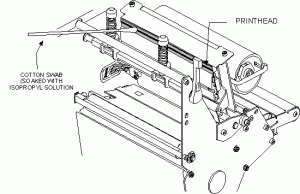
3. Use a cleaning swab (99.7% isopropyl alcohol) and wipe the print elements from end to end. (The print elements are the grayish/ black strip just behind the chrome strip on the underside of the Printhead.) Allow a few seconds for the solvent to evaporate.
4. Rotate the Platen Roller and clean thoroughly with a cleaning swab.
5. Brush or vacuum any accumulated paper lint and dust away from the Rollers
and the Media and Ribbon Sensors.
6. Reload ribbon and/ or media, close and latch the Printhead, restore power
(if necessary) and run the PAUSE Key self test to check print quality.
Click here for Pens and Kits information

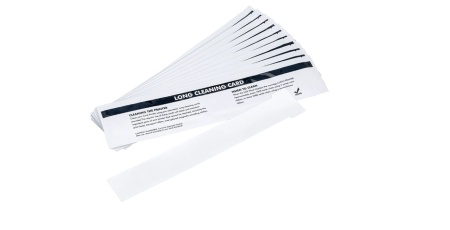
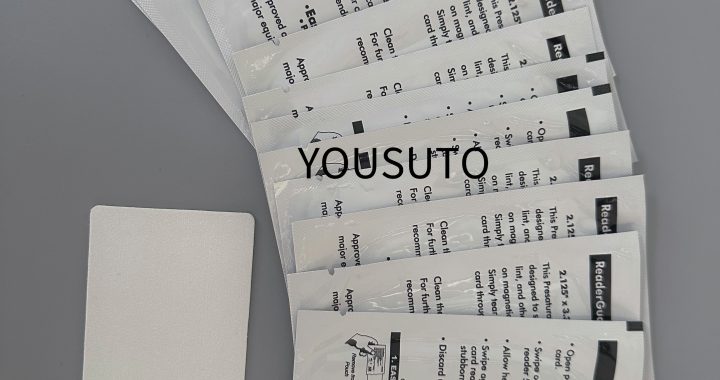
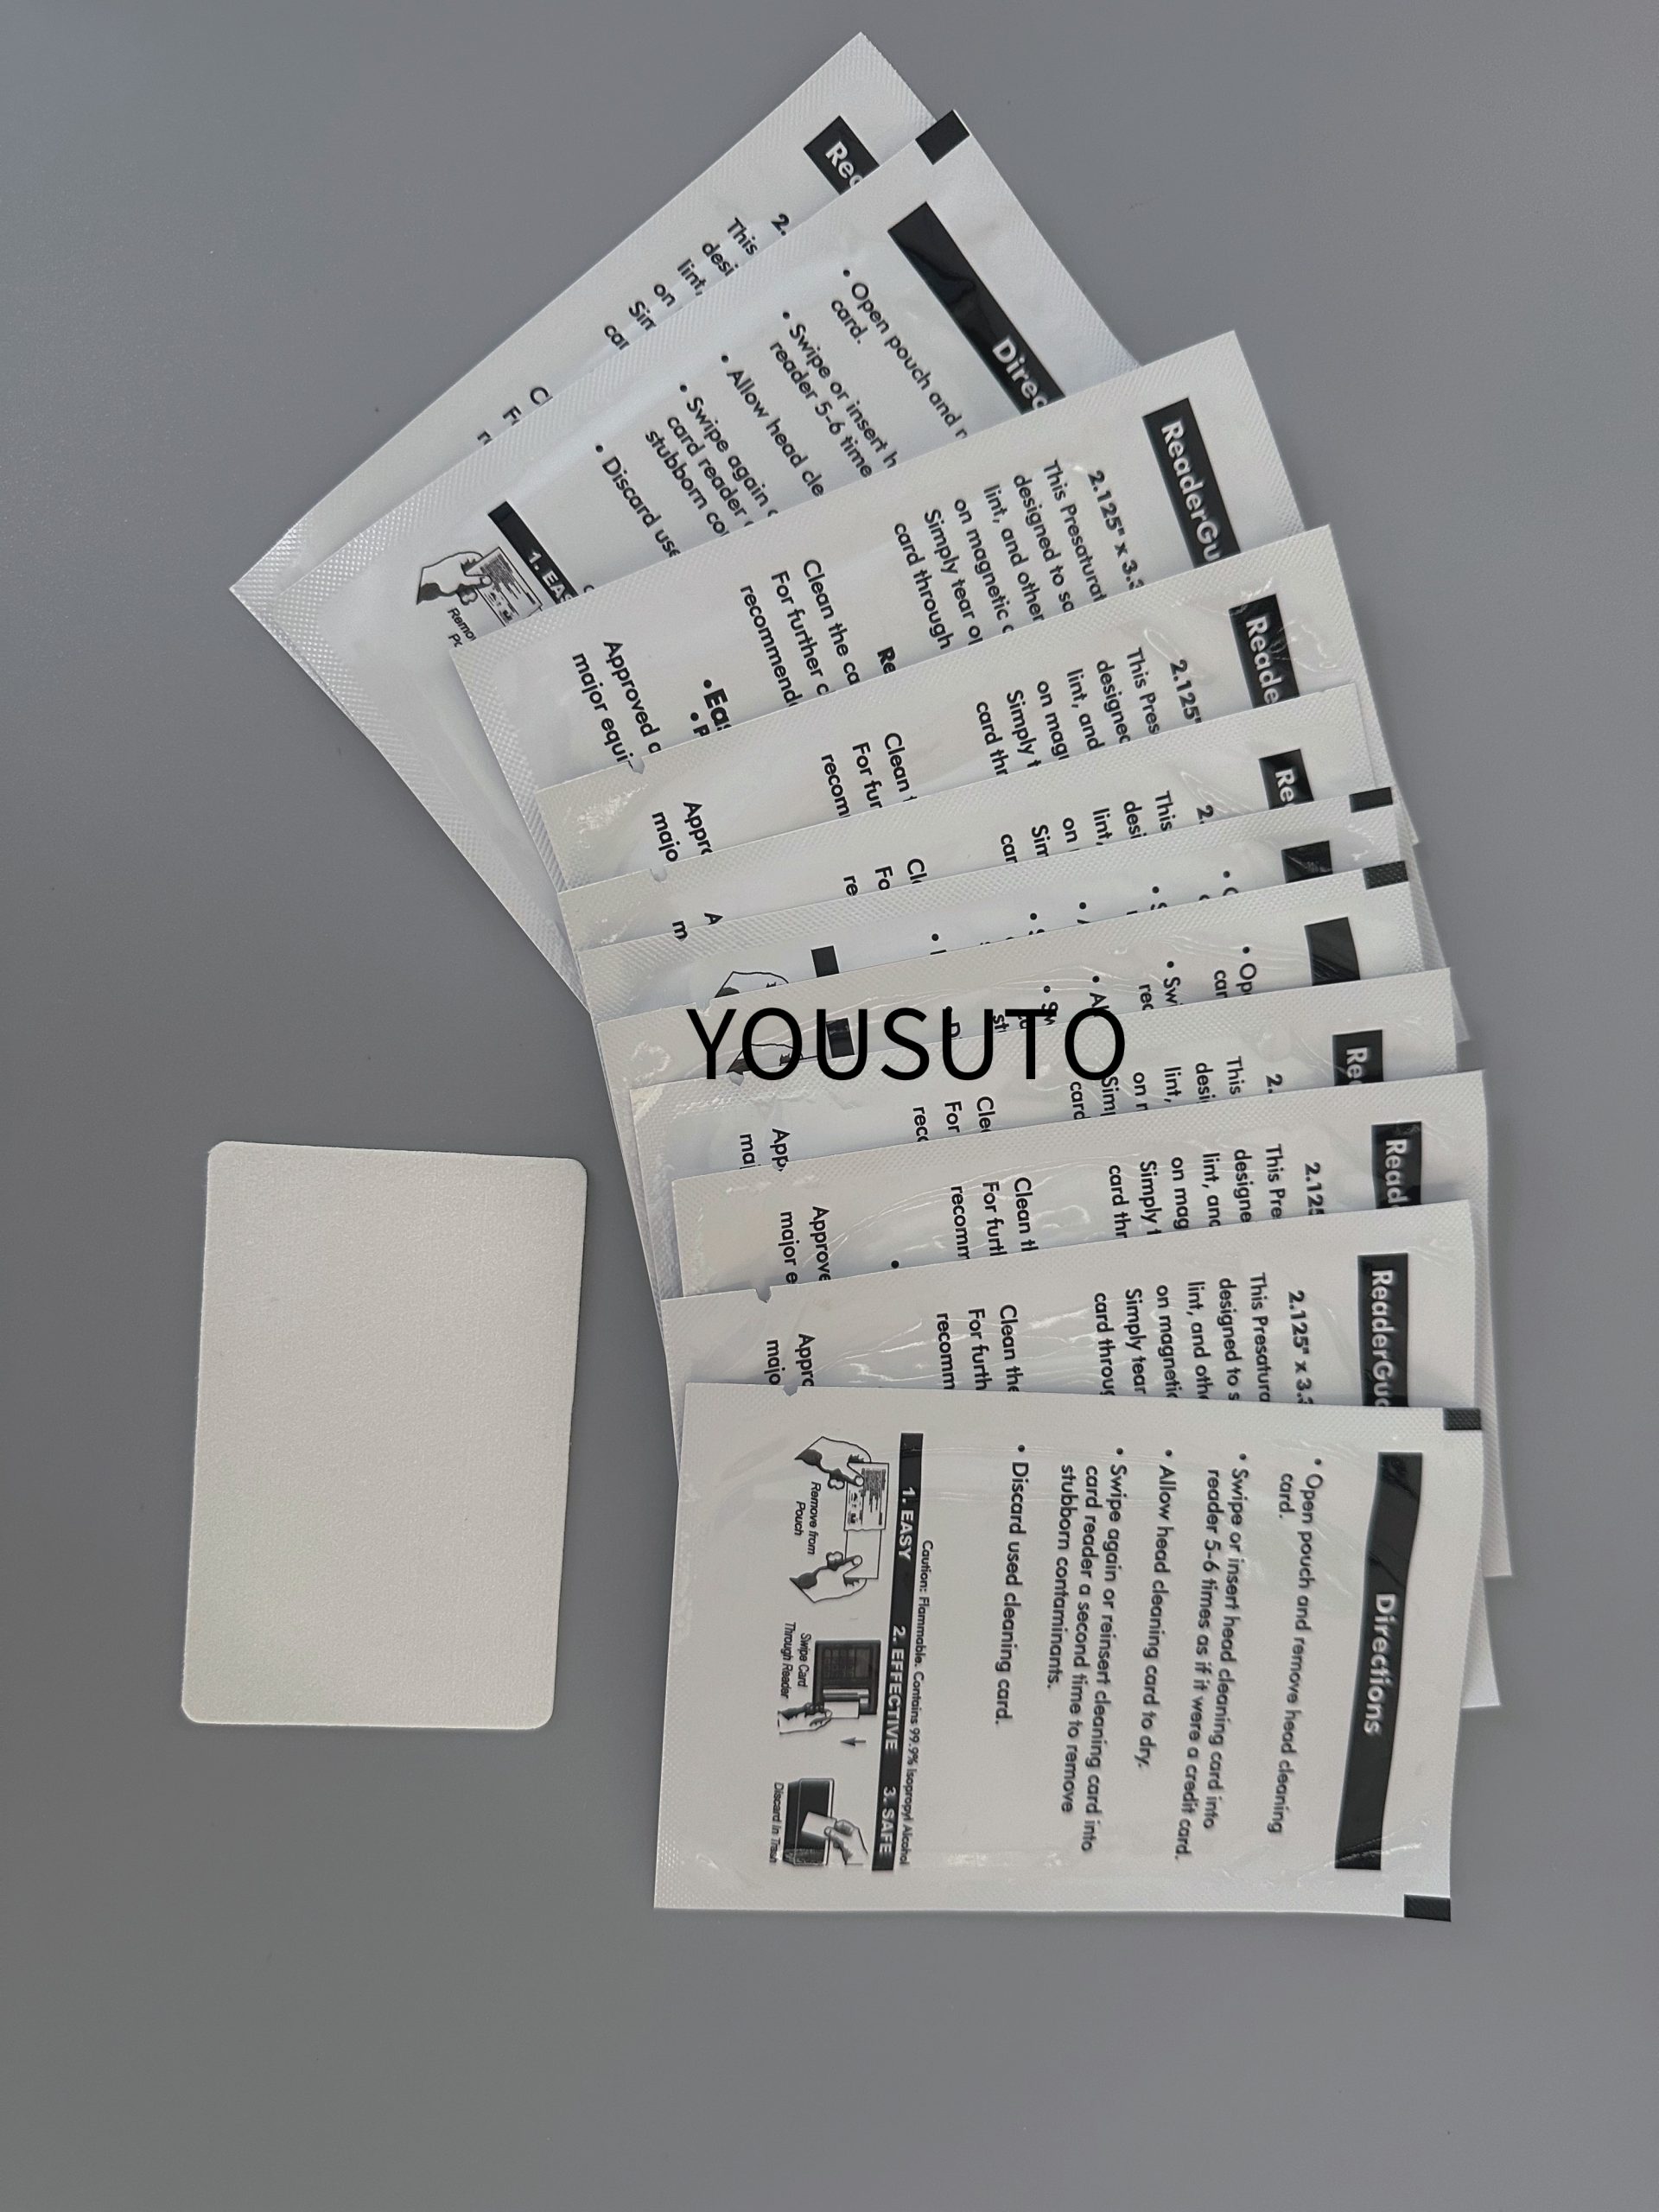
Note: Silverline RFID printer printheads must only be cleaned using Save-A-Printhead Cleaning Film shown below.

Helpful Information

Extending the life of your printhead Read More>>

Tough or hardened printhead buildup can be removed using “Save A Printhead” Cleaning Strips  Read More>>
Part Numbers for Save-A-Printhead Cleaning Film Kits. Order kit number: For Printers with Print Widths:

  • 46902  3.0″ – 4.0″  (76 mm–102 mm)
  • 44902  4.0″ – 5.0″ (102 mm – 127 mm)
  • 48902  5.0″ – 6.0″ (127 mm – 152 mm)
  • 38902  6.0″ – 7.0″ (152 mm – 178 mm)
  • 22902  8.0″ – 9.0″ (178 mm – 229 mm)

Cleaning the Printhead

Cleaning the Printhead

Always use a new cleaning pen on the printhead. (An old pen carries contaminants from its previous uses that may damage the printhead.)
The printhead becomes hot while printing. To protect from damaging the printhead and risk of personal injury, avoid touching the printhead. Use only the cleaning pen to perform maintenance.
When you load new media, you can also clean the printhead.
  • Rub the cleaning pen across the dark area of the printhead. Clean from the middle to the outside. This will move adhesive transferred from the edges of the media to the printhead outside of the media path.
  • Wait one minute before closing the printer.
    When you clean the printer, use one of the following supplies that best suits your needs:
    Cleaning Supplies
    Cleaning Supplies
    Order Quantity
    Intended Purpose
    Cleaning pens (105950-035)
    Set of 12
    Clean printhead
    Cleaning swabs (105909-057)
    Set of 25
    Clean media path, guides and sensors
    You can obtain cleaning supplies at zebra.com/supplies.
    The cleaning process takes just a couple of minutes using the steps outlined below.
    Cleaning Process
    Printer Part
    Method
    Interval
    Printhead
    Allow the printhead to  cool for a minute, then use a new cleaning pen to swab the dark line on the printhead cleaning from the center to the outside edges of the printhead. See Cleaning the Printhead.
    After every roll of media.
    Platen roller
    Remove the platen roller to clean. Clean the roller thoroughly with 90% medical-grade alcohol and a cleaning swab or lint-free cloth. See Platen Cleaning and Replacement.
    As needed.
    Peel bar
    Clean it thoroughly with 90% medical-grade alcohol and a fiber-free cleaning swab. Let alcohol dissipate and the printer dries completely.
    Media path
    Exterior
    Use a water-dampened cloth.
    Interior
    Gently brush out the printer.
    Adhesives and media material can over time transfer onto the printer components along the media path including the platen and printhead. This build-up can accumulate dust and debris. Failure to clean the printhead, media path, and platen roller could result in inadvertent loss of labels, label jams, and possible damage to the printer.
    Using too much alcohol can result in contamination of the electronic components requiring a much longer drying time before the printer will function properly.

How to Clean a Zebra Printer with a Cleaning Card”

The following are the general steps for using a cleaning card to clean a Zebra printer:


  1. Preparation work: Ensure that the printer is powered on and in a ready state. Select a cleaning card that matches the printer model. Usually, a long T-shaped path cleaning card and a short T-shaped feeder/input slot cleaning card are included.
  2. Enter the cleaning mode: Press and hold the multifunction control button on the printer for a few seconds until “CLEAN PRINTER” is displayed on the liquid crystal screen. Follow the prompts on the liquid crystal screen, remove all the ribbons and cards from the printer, and close the printer cover.
  3. Clean the path: When “FEED LONG CLEANING CARD” is displayed on the liquid crystal screen, insert the long T-shaped path cleaning card into the card inlet at the front of the printer. The printer will automatically suck in the cleaning card and perform reciprocating cleaning to clean the internal path of the printer. After the cleaning is completed, “REMOVE LONG CLEANING CARD” will be displayed on the liquid crystal screen. At this time, take out the long cleaning card from the printer.
  4. Clean the feeder: When “INSERT FEEDER CLEANING CARD” is displayed on the liquid crystal screen, open the feeder cover, insert the short T-shaped cleaning card, close the feeder cover, and the printer will start to clean the feeder part. After the cleaning is completed, “REMOVE FEEDER CLEANING CARD” will be displayed on the liquid crystal screen. Take out the short cleaning card from the printer.
  5. Complete the cleaning: After all the cleaning cards are taken out, “Done” will be displayed on the liquid crystal screen, indicating that the cleaning process is completed. Reinstall the cards and ribbons, and the printer can be used normally.


There may be slight differences in the specific operation steps for different models of Zebra printers. In addition, in order to maintain the performance of the printer, it is recommended to use the cleaning card for cleaning regularly. The specific cleaning frequency can be determined according to the usage of the printer and changes in print quality.
How do you use a thermal printer cleaning card?

How do you use a thermal printer cleaning card?

How to Use a Thermal Printer Cleaning Card:

How do you use a thermal printer cleaning card?

  1. Step 1: Turn Off the PrinterBefore performing any cleaning, always ensure the printer is turned off and unplugged from the power source to avoid any accidents or electrical issues.

    Step 2: Open the Printer Cover

    Depending on your printer model, open the printer cover to access the internal components, including the print head and paper path. For some printers, you may need to remove the paper roll to access the print head and guides.

    Step 3: Remove the Current Paper Roll

    Carefully remove any paper or labels currently loaded in the printer. It’s important to clean the printer when there’s no paper inside to prevent contamination.

    Step 4: Take Out the Cleaning Card

    Remove a cleaning card from the package. Most thermal printer cleaning cards come pre-saturated with Isopropyl Alcohol (IPA) or another cleaning solution. Be sure not to touch the cleaning surface to avoid contamination from oils or dirt on your hands.

    Step 5: Insert the Cleaning Card into the Printer

    Insert the cleaning card into the printer just like you would with regular paper or labels. For most printers, you’ll want to insert it into the paper feed slot, ensuring that the card is aligned properly.

    Step 6: Run the Cleaning Card Through the Printer

    Gently feed the cleaning card through the printer’s paper path. If your printer has an automatic feed mechanism, the card will pass through the rollers and print head. Allow the card to travel through the entire paper path. As it moves through, it will loosen and capture dirt, dust, and other contaminants from the print head, paper guides, and other internal components.

    If the printer doesn’t have automatic feed, you may need to manually feed the card through the rollers until it exits the other side. Alternatively, some printers allow you to perform the cleaning process via the printer’s maintenance or cleaning menu.

    Step 7: Wait for the Cleaning Process to Finish

    Once the cleaning card has fully passed through the printer, remove it from the output tray. Depending on the printer model, you may see the printer perform a few final checks or cleaning steps automatically. Allow the printer to dry completely before inserting a new paper roll.

    Step 8: Reload Paper or Labels

    After the cleaning process is complete and the printer has dried, you can reload the printer with new paper, labels, or tickets. Your printer is now cleaned and ready to produce high-quality prints again.


    Tips for Best Results

    • Frequency: Cleaning your thermal printer every time you replace the paper or label roll is ideal for preventing buildup. Depending on your printer’s usage, you may need to clean it every 1,000 to 2,000 prints or as recommended by the manufacturer.
    • Avoid Over-Saturating: If you’re using a cleaning card that isn’t pre-saturated, ensure that it’s not too wet. Too much solution could lead to excess residue or damage to the printer’s internal components.
    • Check the Printer’s Manual: Some printers have specific cleaning instructions or cleaning cycles. Always refer to the user manual for guidance on proper cleaning techniques.
    • Use OEM Cleaning Cards: While third-party cleaning cards are available, using the manufacturer’s recommended cleaning cards (OEM) ensures compatibility and optimal cleaning performance.

    Conclusion

    Using a thermal printer cleaning card is an essential part of regular maintenance to ensure your printer operates at its best. By following the simple steps outlined above, you can effectively clean the print head, paper guides, and other internal components, improving print quality and reducing the risk of paper jams. Regular cleaning can help extend the lifespan of your thermal printer and prevent costly repairs down the line.

    So, the next time you replace the paper roll or notice a decline in print quality, don’t forget to run a cleaning card through your thermal printer to keep it running smoothly.

By following these steps, you’ll help maintain your thermal printer’s performance and extend its lifespan.

https://yousuto.com/contact-uscard-printer-cleaning-kit-dust-free-purification-cotton-swab-dust-free-cloth-manufacturer/

Anti-static Silicone Non-slip Mat

In industries such as electronics manufacturing, mobile phone assembly, and optical glass, product safety and quality are paramount. The anti-static silicone non-slip mat is an essential tool that effectively prevents products from slipping, absorbs vibrations, and protects sensitive electronic devices. It is particularly suitable for products with LCD screens, mobile phone covers, optical glass, backlight modules, CD glass, and more.

1. Prevents Slippage, Ensures Product Safety

One of the main functions of the anti-static silicone non-slip mat is to prevent products from slipping during operation or storage. With its excellent surface friction, it firmly holds products in place, reducing the chances of movement. This is especially critical in environments that require high precision, such as mobile phone assembly lines or optical glass manufacturing workshops.

2. Vibration Resistance, Reducing Damage Risk

Silicone material has superior vibration resistance. This feature is crucial because it minimizes the risk of damage to products during transport or handling. For fragile items like LCD screens, mobile phone covers, and optical glass, vibration protection significantly reduces the chances of product breakage or failure during production or shipping.

3. High-temperature Resistance, Suitable for Various Environments

This non-slip mat boasts excellent high-temperature resistance, withstanding temperatures up to 200°C. Whether during high-temperature soldering of electronic components or other heat-intensive processes, the anti-static silicone non-slip mat remains stable and provides reliable protection.

4. Soft Material, Protecting Precision Equipment

In addition to being non-slip and heat-resistant, the silicone material is soft, effectively preventing scratches and bumps. This is especially important for precision components like mobile phone covers and optical glass. The softness of the silicone mat ensures that it won’t cause additional friction or damage when in contact with devices, maximizing surface protection.

5. Anti-static Function, Protecting Electronic Components

The anti-static silicone non-slip mat also has excellent anti-static properties, with a surface resistance of 10^6 to 10^9 ohms. This effectively prevents static buildup, protecting sensitive electronic devices from static damage. This is particularly important for products with LCD screens and mobile phone modules that contain electronic components, as static protection reduces the risk of damage and performance degradation.

6. Washable and Reusable, Environmentally Friendly and Durable

Not only is this silicone non-slip mat highly functional, but it is also easy to clean and reusable, offering excellent durability and environmental benefits. After cleaning, it can continue to be used without compromising its non-slip or anti-static properties, reducing operational costs for businesses while contributing to environmental sustainability.

7. Wide Range of Applications

The anti-static silicone non-slip mat is widely used in various industries, including mobile phone production, optical glass manufacturing, LCD assembly, and backlight module assembly. Whether on mobile phone module production lines, optical glass cutting workshops, or backlight testing environments, this mat plays a crucial role.

Isopropyl alcohol, IPA cleaners, electronic cleaning, PCB cleaning, optical instruments, precision components, solvent power, quick evaporation, non-conductive, flammability, lint-free wipes, cleaning swabs, material compatibility, safety precautions, fire hazard, storage, skin irritation, respiratory protection, disinfection, precision cleaning

Cleaning and Maintenance of Check Scanners

Lottery machines and check scanners are widely used in the financial and service industries. Regular cleaning and maintenance are crucial for these frequently used devices. Keeping them clean not only extends their lifespan but also improves efficiency and reduces the chance of malfunctions. This article will cover how to use lottery machine cleaning cards and check scanner cleaners, along with cleaning and disinfection guidelines.

1. Cleaning and Maintenance of Lottery Machines

1.1 Importance of Cleaning Lottery Machines

Lottery machines handle a large number of paper tickets daily, which leads to the accumulation of dust, paper debris, and grease in the paper path, card reader, and print head. These accumulations can affect the machine’s normal operation, causing issues such as poor ticket dispensing, misreads, or system malfunctions.

1.2 Using Lottery Machine Cleaning Cards

Lottery machine cleaning cards are specially designed tools for cleaning the internal pathways and card readers of lottery machines. These cards are typically made of materials soaked in cleaning solutions that effectively remove dirt and debris. Here’s how to use them:

  • Turn off the machine: To avoid electrical issues during cleaning, it’s recommended to turn off the lottery machine before cleaning.
  • Insert the cleaning card: Insert the cleaning card into the paper path of the machine and run the normal ticket dispensing process. The card will clean the machine’s internal pathways and remove dust and debris.
  • Repeat if necessary: Depending on the condition of the machine, you may need to use the cleaning card multiple times to ensure thorough cleaning.

1.3 Maintenance Tips

  • Regularly clean the paper path and card reader—light cleaning once a week and deep cleaning once a month.
  • Store cleaning cards and other tools in a cool, dry place to prevent moisture damage.
  • Inspect the print head and remove any paper dust to maintain print quality.

2. Cleaning and Maintenance of Check Scanners

2.1 Importance of Cleaning Check Scanners

Check scanners handle paper checks, which can accumulate dust, ink residue, and paper debris. Without regular cleaning, these contaminants may cause scanning errors, lower image quality, or lead to paper jams.

2.2 Using Check Scanner Cleaners

Check scanner cleaners, typically pre-soaked cleaning cards, effectively clean the scanner’s paper feed path and scanning head. Here’s how to use them:

  • Turn off the scanner: To avoid malfunctions during cleaning, it’s best to turn off the scanner.
  • Insert the cleaning card: Insert the cleaning card into the check scanner’s paper feed slot and run a normal scanning process. The card will clean the feed path and remove debris that could affect scanning quality.
  • Repeat as needed: For high-usage scanners, it’s recommended to clean them weekly to maintain optimal performance.

2.3 Maintenance Tips

  • Regularly inspect and clean the scanning head to ensure clear image quality.
  • Use check scanner cleaning cards regularly and wipe down the exterior of the machine with a dry cloth after cleaning.
  • Lubricate the moving parts of the scanner to prevent mechanical wear and reduce the likelihood of paper jams.

3. Cleaning and Disinfection Guidelines for Lottery Machines and Check Scanners

In addition to using cleaning cards and other cleaning tools, proper disinfection of the equipment is essential for maintaining hygiene.

3.1 Cleaning and Disinfection Steps

  • Turn off the machine: Always ensure that the machine is powered off before cleaning or disinfecting to avoid short circuits or damage.
  • Use IPA cleaner: Use a 70% isopropyl alcohol (IPA) solution to clean the surfaces, especially touchscreens, buttons, and other frequently touched parts. IPA is effective at removing dirt and evaporates quickly, allowing the device to be back in use in a short time.
  • Avoid water-based cleaners: Do not use water-based cleaners when cleaning lottery machines or check scanners, as liquid can seep into the equipment and damage electronic components.
  • Ensure proper ventilation: During cleaning and disinfection, ensure the workspace is well-ventilated to avoid inhaling the fumes from cleaning agents.

3.2 Regular Disinfection Schedule

Depending on usage frequency, a weekly or monthly disinfection routine is recommended, especially in high-traffic environments like banks and convenience stores.

Conclusion

As important devices in the financial services sector, regular cleaning and maintenance of lottery machines and check scanners are essential. By using specially designed cleaning cards and tools, you can significantly reduce malfunction rates and enhance device performance. Additionally, proper disinfection practices ensure the cleanliness and hygiene of the equipment, protecting both customers and staff.

Cleaning and Maintenance of Financial Equipment

Maintenance Guide for Printers and Scanners

Professional Cleaning Solutions: Maintenance for Printers and Scanners

1. Printer Cleaning Paper

Use: Printer cleaning paper is primarily used for the regular maintenance of laser printers and inkjet printers. This cleaning paper can remove dust, toner residue, and paper debris from inside the printer, preventing issues like reduced print quality and paper jams.

Application: Simply place the cleaning paper in the printer’s paper tray and run it through the printer like a normal print job. The cleaning paper will pass through the printer’s rollers and printhead, removing accumulated dirt.

2. Cleaning Cards

Use: Cleaning cards are commonly used to clean magnetic card readers, POS machines, ATMs, and certain types of printers. They can clean the internal magnetic heads and rollers of devices, removing dust and other contaminants.

Application: Insert the cleaning card into the device and follow the device’s operating instructions for cleaning. Cleaning cards typically come pre-moistened with a cleaning solution that effectively dissolves and removes stubborn residues.

3. Cleaning Pens

Use: Cleaning pens are used for precise cleaning of critical areas in printers and scanners, especially the printheads and scan heads. These areas often accumulate fine dust and dirt that can affect print or scan quality if not cleaned regularly.

Application: Use the cleaning pen to gently wipe the surface of the printhead or scan head. Cleaning pens usually have a soft tip with cleaning solution that safely removes dirt from sensitive areas without damaging the equipment.

4. Thermal Printhead Cleaning Products

Use: Thermal printheads are commonly found in thermal printers, such as receipt printers and label printers. These printheads are particularly sensitive to dirt and grease, and if not cleaned regularly, can lead to decreased print quality or even damage the printhead.

Application: Use dedicated thermal printhead cleaning cards, cleaning paper, or cleaning solution to gently wipe the surface of the printhead. These cleaning products are specifically designed to remove residues and grease from thermal printheads, extending their lifespan.

Summary

Professional cleaning solutions for printers and scanners can effectively maintain optimal performance, reduce the likelihood of malfunctions, and extend the equipment’s lifespan. It is recommended to regularly use the above cleaning products according to the device’s usage frequency to ensure consistent print and scan quality.

Cleaning and Maintenance of Financial Equipment

Cleaning and Maintenance of Financial Equipment

Devices such as check scanners, ATMs, cash recyclers, and bill counters are central to daily operations. These devices not only need to accurately read data but also efficiently process various checks and cash. Therefore, regular cleaning and maintenance are crucial for ensuring the smooth operation of these devices and extending their lifespan. This article will share how the proper use of cleaning tools and professional maintenance methods can keep financial equipment in optimal condition.

Cleaning Tips for Check Scanners and ATMs

Using Cleaning Cards and Cleaning Sheets

Check scanners and ATMs handle a large number of checks and cards daily, which leads to dust and dirt accumulation over time, affecting the accuracy of the device’s reading capabilities. To address this issue, the market offers cleaning cards and cleaning sheets specifically designed for financial equipment.

Cleaning cards (such as “card reader cleaning cards”) are soft, durable cards designed to clean the card reader slots of devices. They can easily reach inside the slots and wipe off dust and stains from the reading heads. Regular use of cleaning cards helps ensure that the device can always accurately read card information, reducing transaction errors.

Cleaning sheets (such as “printer roller cleaning sheets”) are used to clean the printer rollers inside ATMs and check scanners. When inserted into the device, the cleaning sheet contacts the rollers, removing dust and residues that have adhered to them, thereby maintaining the device’s proper function.

Regular Professional Maintenance

Although daily use of cleaning cards and sheets can effectively keep the equipment clean, regular professional maintenance is also essential for complex devices like ATMs. Professional technicians can perform comprehensive inspections and maintenance, identifying potential faults and performing timely repairs. Additionally, professional cleaning services can further reduce the likelihood of equipment malfunctions, ensuring the security and stability of financial transactions.

Cleaning and Maintenance of Cash Handling Equipment

Focusing on Cleaning the Bill Path

Cash recyclers (such as “arca cash recycler”) and bill counters (such as “jcm bill acceptor”) are critical for handling cash in financial institutions. These devices process large volumes of banknotes through the bill path, making its cleanliness particularly important. Over time, dust, paper scraps, and other debris can accumulate in the bill path, potentially causing device jams or misreads.

To ensure the device operates smoothly, it is recommended to regularly clean the bill path. Specialized cleaning brushes and air blowers can be used to thoroughly remove dust and debris from the path, ensuring the smooth passage of banknotes.

Using Specialized Cleaning Kits

In addition to regular cleaning, using electronic cleaning kits specifically designed for cash handling equipment (such as “electronic cleaning kit”) can be beneficial. These kits usually contain various cleaning tools and solvents that can comprehensively clean different parts of the device. For example, soft brushes can clean hard-to-reach crevices, specialized cleaners can effectively dissolve stubborn stains, and anti-static cloths can prevent static damage to the equipment during cleaning.

Using specialized cleaning kits not only improves cleaning efficiency but also reduces wear and tear on the equipment, extending its lifespan.

Conclusion

The proper operation of financial equipment is crucial to the daily operations of financial institutions. By regularly using cleaning cards, cleaning sheets, and professional cleaning kits, dust and stains inside the equipment can be effectively removed, ensuring the accuracy and stability of the devices. Additionally, scheduling regular inspections and maintenance by professional technicians can help identify and address potential issues early, ensuring long-term reliable operation.

Whether it’s a check scanner, ATM, cash recycler, or bill counter, maintaining the cleanliness and proper upkeep of the equipment is a key step in ensuring its efficient operation. Financial institutions should prioritize this aspect, incorporating equipment cleaning and maintenance into their daily management processes, thereby enhancing overall operational efficiency.

Zebra 105999-400 Printer Cleaning Kit

Extend the life of your Zebra printer with a cleaning kit

In order to ensure long-term stable operation of the printer and maintain excellent print quality, regular maintenance is particularly critical. Zebra Printer Cleaning Kits provide an easy and effective way to maintain your printing equipment, extending its life and ensuring efficient daily operations.

Why Printer Maintenance Is Critical?

Regular printer maintenance not only reduces the risk of equipment failures and deterioration in print quality but also saves on repair costs and time. Especially in high-frequency use environments, printer components such as transmission belts, cleaning rollers, and printheads are susceptible to dust, ink residues, and other dirt. If not cleaned promptly, these accumulations can lead to paper jams, blurred ink, or even equipment malfunctions.

Benefits of Using Zebra Printer Cleaning Kits

  1. Comprehensive Cleaning: Zebra printer cleaning kits include various professional tools such as cleaning cards and swabs, which thoroughly clean critical internal printer components, ensuring stable print quality.
  2. Equipment Protection: Regular use of cleaning kits effectively protects printer transmission parts and printheads, prolonging device lifespan and reducing maintenance and replacement costs.
  3. Enhanced Efficiency: Cleaning your printer regularly prevents printing interruptions and quality issues, enhancing work efficiency and user satisfaction.

Steps to Use: How to Properly Clean Zebra Printers

  1. Prepare Cleaning Tools: Ensure you have an adequate supply of cleaning cards, swabs, and other tools necessary to effectively remove internal and external dirt.
  2. Execute Cleaning Procedures: Follow the instructions provided with the Zebra printer cleaning kit to sequentially clean printer transmission belts, cleaning rollers, printheads, and other components. Ensure thorough cleaning of each part without leaving residues.
  3. Establish Regular Maintenance: Establish a regular maintenance schedule based on usage frequency to ensure your printer remains in optimal working condition.

Conclusion

By using Zebra printer cleaning kits, you can not only extend the life of your device, but also improve print quality and productivity. Zebra 105999-400 Printer Cleaning Kit, including 4 CR80 cleaning cards and 12 cleaning swabs, is designed to keep your printing equipment clean and running efficiently. Regular maintenance of your printer will become an important part of ensuring the smooth operation of office processes, while saving maintenance costs and time, bringing more convenience and reliability to your work and life.